Setting up your Raspberry Pi 3 Model B
Starting Set up
Each team should get a monitor, keyboard and mouse.
- Insert the mini SD card in the Raspberry Pi , connect the mouse and keyboard in the USB ports, and the display with provided HDMI-DVI cable. Then, using Y-cable, power it up by plugging in the charger.
- The operative system starts. Then, click on the terminal icon next to the menu to open it.
- Then you need to run some commands in the terminal as root user to configure the Raspberry Pi (RPi). The root user has the permission to modify files or default settings as administrator providing the root password. The root user is pi and the default root password is raspberry. First we will make stronger the password, but first, we will change some default setups:
$ sudo raspi-config
Note: To execute any Linux command as root user, the sudo command presides the Linux command.
- The terminal will show a menu which can be navigated with the arrows on your keyboard and accept options with enter.
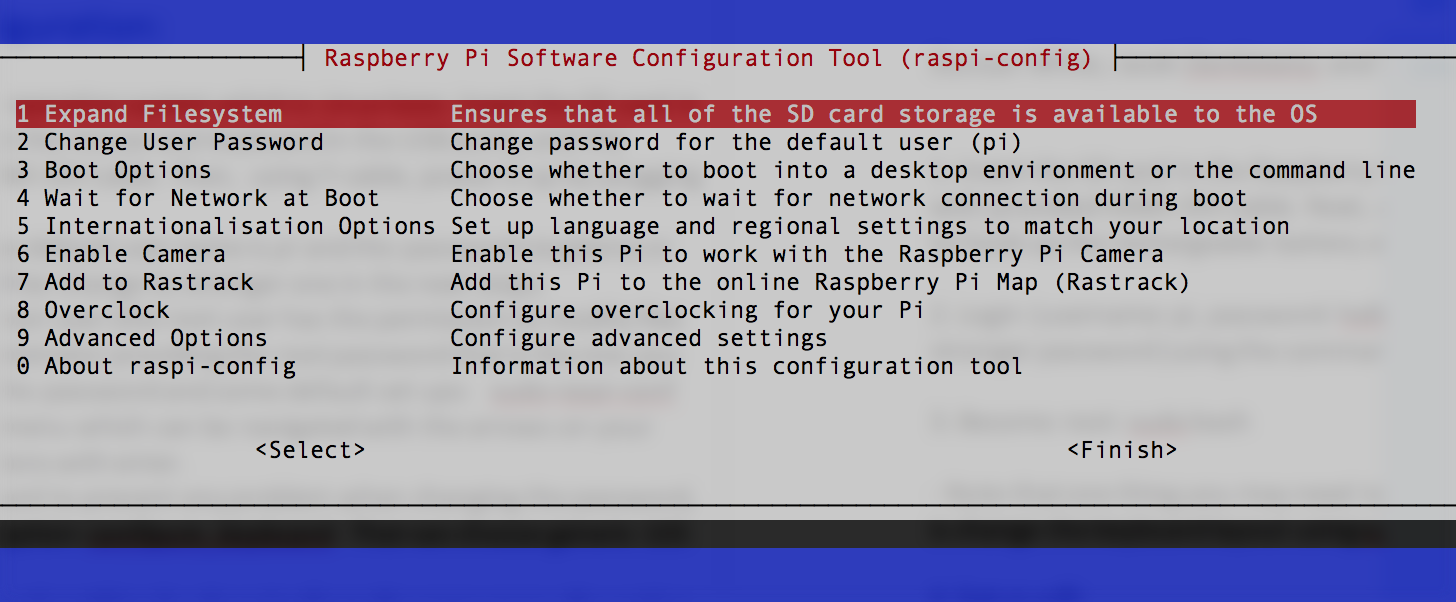
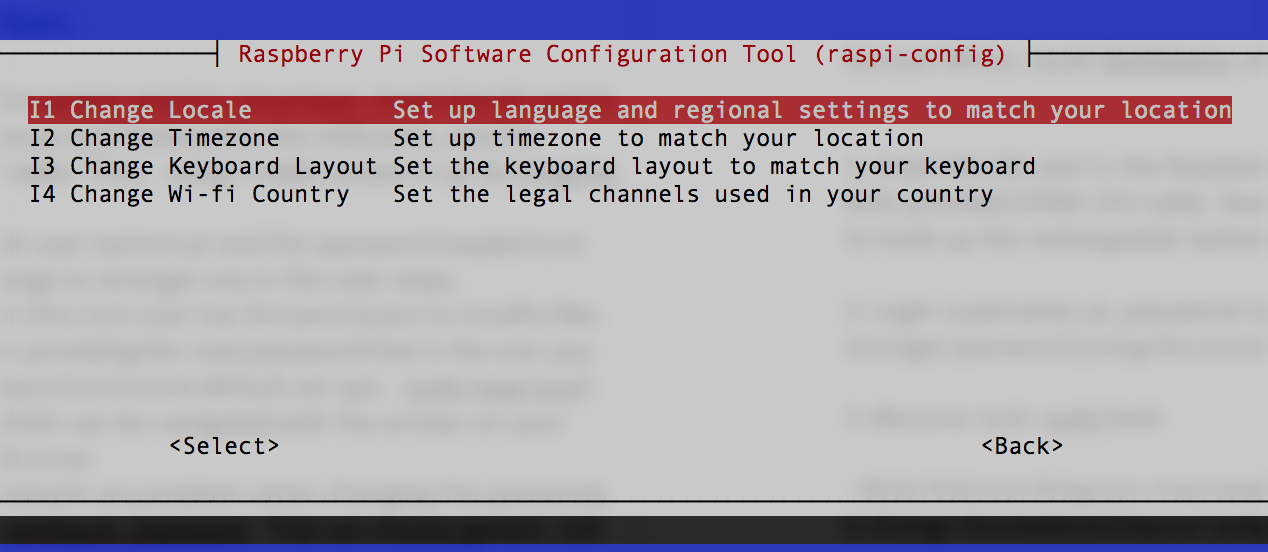
- Then we set up the keyboard to prevent any problem when changing the password, therefore we access the option: Internationalisation Options –> Change the Keyboard Layout. Then we choose generic 105 key, and then UK.
- Also we have option to change the timezone from this menu.
-
To change the password, we return to the main menu and choose the second option. We have to set the new password and do not reboot the RPi yet.
-
We check that the ssh for remote network communications is enabled (security shell cryptographic network protocol). We access to the Advance Options –> SSH.
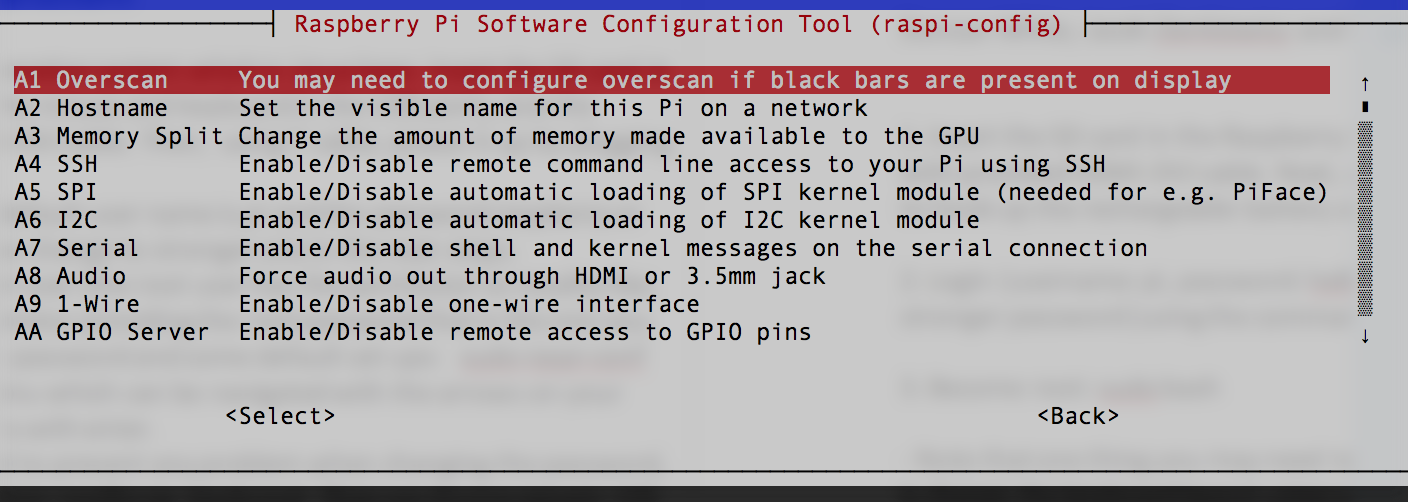
- An optional step is to change the hostname in the same advance menu.
- Then we restart the RPi.
Setting WiFi from Imperial College network
- You will see there is no IP assigned to our PRI, therefore to set up the WiFi we need to modify a configuration file, but first we need to back it up:
$ sudo cp /etc/wpa_supplicant/wpa_supplicant.conf /etc/wpa_supplicant/wpa_supplicant.conf_backup
Then we will edit the wpa_supplicant.conf:
$ sudo nano /etc/wpa_supplicant/wpa_supplicant.conf
The default text editor installed in the RPi is nano. We can install also vim or vi to have another option of a text editor.
This file should just have the next line at the beginning:
ctrl_interface=DIR=/var/run/wpa_supplicant GROUP=netdev
update_config=1
Then we add to the content of wpa_supplicant.conf the lines after # IC (the configuration is case sensitive, so make sure you do not have typos):
ctrl_interface=DIR=/var/run/wpa_supplicant GROUP=netdev
update_config=1


# IC
network={
        ssid="Imperial-WPA"
        proto=RSN
        key_mgmt=WPA-EAP
        pairwise=CCMP
        auth_alg=OPEN
        eap=PEAP
        identity="ic\COLLEGE_USERNAME"
        password="YOUR_PASSWORD"
}
This is the Imperial College configuration in which you have to replace “COLLEGE_USERNAME” with a valid college username, please do not store your password in plain text, but we will change it after verifying that the WiFi is working. Reboot the system if it is necessary. Note: In case you are working with your team, and you do not want to show your password, just leave the field blank and follow the next steeps to encrypt your password before setting it up in the wpa_supplicant.conf.
Encrypting Password
In order to not store the password in a plain text we encrypt our password with an MD4 hash generated from the corresponding college password. You can generate the hash like this with the next Linux command:
$ echo -n 'YOUR_PASSWORD' | iconv -t utf16le | openssl md4
This command will display the encrypted password on your terminal like:
$ (stdin)= a6c71eedc2eacbca84003336a4a62a1c
Then you can copy the string that was generated in your terminal screen similar to the one of the example above: a6c71eedc2eacbca84003336a4a62a1c.
Note: Also you can save the hash from your password in a file and then read its content:
$ echo -n 'YOUR_PASSWORD' | iconv -t utf16le | openssl md4 > hash.txt
$ cat hash.txt
The cat command is used to read and concatenate files.
Then open the wpa_supplicant.conf to add the hashed password you generate:
$ sudo nano /etc/wpa_supplicant/wpa_supplicant.conf
In the password field replace “YOUR_PASSWORD” with the string you generated as hexadecimal characters, and we add the ‘hash:’-prefix) in the similar fashion as in the example bellow:
# IC
network={
        ssid="Imperial-WPA"
        proto=RSN
        key_mgmt=WPA-EAP
        pairwise=CCMP
        auth_alg=OPEN
        eap=PEAP
        identity="ic\COLLEGE_USERNAME"
        password=hash:a6c71eedc2eacbca84003336a4a62a1c
}
A last security step to do is to remove the bash history, with all the commands we had typed on the terminal. Therefore, we do it like:
$ history -w
$ history -c
Then we reboot again the RPi to check that the password was properly set up.
Installing Python
To install Linux packages in our system we must use the command: sudo apt-get install name_of_package. The installation could take some minutes.
Updating operative system
sudo apt-get update
Installing C lib needed by Python:
sudo apt-get -y install libffi-dev
sudo apt-get -y install libssl-dev
Installing Python:
sudo apt-get -y install build-essential python-dev python-openssl
sudo apt-get -y install python-setuptools
sudo apt-get -y remove --purge python-pip
sudo apt-get -y install python-pip
sudo pip install --upgrade pip
Installing other text editor:
sudo apt-get -y install vim
Remote connection to your Raspberry Pi
Weaved services connect you easily and securely to your Pi from a mobile app, browser window and a terminal. Control remote computers using tcp hosts such as SSH. You will be able to connect to your RPi from laptop or desktop at home. The free weaved account allows for 10 registered services and 30 minute connections on up to 1 concurrent service(s).
Installing weaved:
Manage network devices remotely using weaved service. To install:
sudo apt-get -y install weavedconnectd
Weaved configuration:
- To configure weaved in our RPi, first we need to open an account in weaved website. You can register from your laptop or desktop. Once you have it, from your Rpi terminal you will execute a command to link your RPi to your weaved account:
sudo weavedinstaller - Enter your Weaved account username and password. Next, you will see this menu:
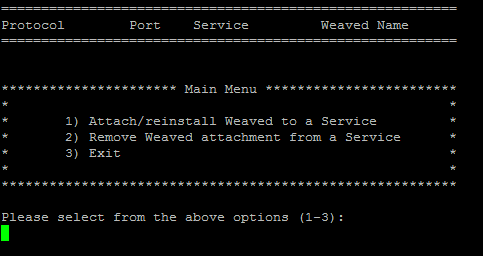
- Initially you won’t have any Weaved services installed, so the upper part is empty. Enter 1 to attach Weaved to an existing TCP service (host) on your Raspberry Pi. You should now see the following screen:
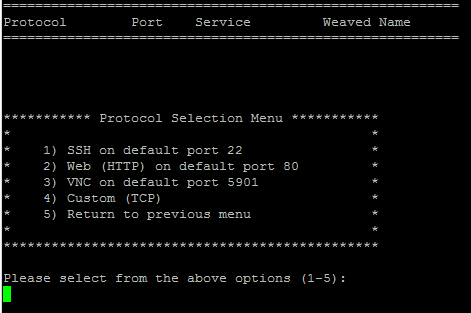
Enter 1 for SSH.
- Next, we accept the default port (y).

- The installer confirms your choice and asks you to give this connection a name (you can make it up, but remember to make a name easy for you to identify a specific RPi in case you have more than one attached to the weaved service.):

You will now return to the main menu, where you can see your Weaved Service Connection installed, then enter 3 to exit.
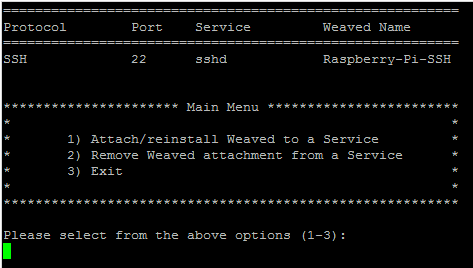
Accessing from your computer (Linux or Mac OS X)
We sill see here how you can access using your laptop or any other desktop from any terminal. First, if you login to your weaved account, you will get a list of the services linked to your devices:
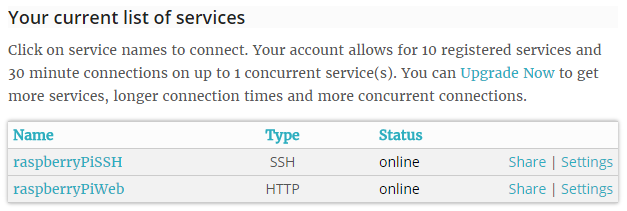
In your case you will have just one item with a Type SSH as in the first line at the screen shoot above. When you click on the name of you device, your browser will open and show you a widow like:
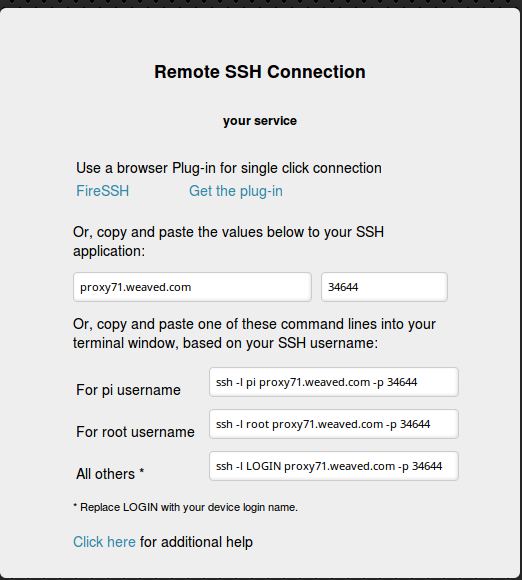
Then we copy the command after For pi username, in this example it is: ssh -l pi proxy71.weaved.com -p 34644. For you it will be different. Then, paste the command in your laptop or desktop terminal (If you are using a Mac or Linux all will work, but for windows you have to install a SSH and Telnet client).
Then, you are connected from your laptop to your RPi!! You don’t need the display and mouse anymore!
Accessing from your computer (Windows)
If your computer operative system is Windows, to access remotely you will need to install PuTTY, which is a free implementation of SSH and Telnet for Windows and Unix platforms. To download it click here.
Once downloaded, double click on the putty.exe and you will see the window looks like below:
Then, if you login to your weaved account, you will get a list of the services linked to your devices:

In your case you will have just one item with a Type SSH as in the first line at the screen shoot above. When you click on the name of you device, your browser will open and show you a widow like:

Insert the server address and port obtained from Weaved.com into Putty and connect!
When asked for username and password, please use your RPi username and password to log-in. (Please note, this is not weaved username and password).
To exit your putty session, type “exit” and enter.
Virtual terminal
Remember you can just be connected during 30 minutes using weaved, after that time you have to connect again to your account and do the same procedure we explained in the previous section. Therefore we will show you how a virtual terminal can help you when you are working on your RPi.
Screen is a full-screen software program allows you to use multiple windows (virtual VT100 terminals) in Unix. It offers a user to open several separate terminal instances inside a one single terminal window manager.
The screen application is very useful, if you are dealing with multiple programs from a command line interface and for separating programs from the terminal shell. It also allows you to share your sessions with others users and detach/attach terminal sessions.
When to use screen?
One of the advantages of Screen, is that you can detach it. Then, you can restore it without losing anything you have done on the Screen. One of the typical scenario where Screen is of great help is when you are in the middle of SSH session and you want to download a file, update the operative, or transfer a big file to your RPi. The process could be 2 hours long. If you disconnect the SSH session, or suddenly the connection lost by accident, then the download process will stop. You have to start from the beginning again. To avoid that, we can use screen and detach it.
Installing screen
The screen program allows you to use multiple windows (virtual VT100 terminals) in Unix. If your local computer crashes, or you are connected remotely and lose the connection, the processes or login sessions you establish through screen don’t get lost.
sudo apt-get -y install screen
Some Examples to use screen
- When you are in your terminal, you can create a screen or virtual terminal e.g. we will name the screen mysession:

- Then you will be automatically attached to your screen or virtual terminal, that from now on we will call just screen. You can execute now commands and work in the terminal:

- You can detach from the screen by pressing “Ctrl-A” and “d“. Then we will go to our terminal outside the screen session. Then we can check the list of screens:

- We get the list and the screen ID. If we want to attach to a particular screen:

Basic commands to work with the virtual terminals
| Screen command | Description |
|---|---|
screen -S name_of_terminal |
Assigning name to the virtual terminal or screen session. |
screen -ls |
List all the virtual sessions or screens opened. |
screen -X -S name_of_terminal quit |
Kill an specific virtual terminal. |
screen -r name_of_terminal |
Attach to the virtual terminal or screen. |
| Press “Ctrl-A” and “d“ | Detach from virtual terminal or screen. |
| Press “Ctrl-A” and “K” | This command will leave and kill the virtual terminal or screen |
| Press “Ctrl-A” and “n“ | Switching to the next virtual terminal or screen. |
| Press “Ctrl-A” and “p“ | Switching to the previous virtual terminal or screen |
For more examples go to the link or ask the instructors.
To know more about more advance details of how connect remotely go to the advance guide:
Some useful tips and troubleshooting guides
Backup RPi Image
It is useful and advisable to backup a working copy of your RPi image. For example, make a backup copy after setting up WiFi and update the library, the next time the wifi is not working, you can reformat the SD card and reinsert this backup copy to revert back to previous version. After this, your RPI get to connect back to WiFi right away like before. Here are the steps:
For Backing up:
For Windows and Mac OS
- Download Win 32 Disk Imager if none installed on your computer here
- Insert the SDCard into your computer (e.g. via card reader or SD card slot if your computer has one).
- Open Win 32 Disk Imager. Select a location and give a file name for the backup image.
- Select the right drive.
- Click Read.
- Once done, keep this backup copy safe. Please note that the size of the backup is the same size of your SD Card. SO please be mindful that it will take a considerable amount of disk space.
For replacing the image on the SD Card
For Windows and Mac OS
- Download SDFormatter if none installed here.
- Download Win 32 Disk Imager if none installed here or Etcher For Mac here.
- Use SDFormatter to format the SD card. Please be careful and make sure you select the correct drive letter.
- Use Win 32 Disk Imager or Etcher to re-image the backed up image into the SD card. I.e. select the file name, the drive letter of the SD card, and then click Write. Please be careful that the correct drive letter is selected. If you wish to install a fresh Raspbian OS, you can download it here.
- Once this is done, a new image has been rewritten on your SD Card!